Hey there, young gamer! Today, we’re going to talk about something super cool: how to connect your SteelSeries headset to your computer. Whether you’re into gaming or just want to enjoy some awesome sound while watching videos or chatting with friends, having a good headset is essential.
It’s a bit like putting on your favorite superhero cape before you embark on an exciting adventure in the digital world. Imagine your SteelSeries headset as your trusty sidekick, ready to bring the sounds of your virtual world to life.
Discover the gaming excitement at 2048 Station, your ultimate destination for the addictive number puzzle. Play, strategize, and aim for the coveted 2048 tile in this thrilling digital hub
But first, you need to learn how to connect it to your computer. Don’t worry; it’s as easy as putting on your shoes in the morning. By the time we’re done here, you’ll be a pro at setting up your headset. So, let’s dive into this adventure and discover how to make your SteelSeries headset and your computer the best of buddies.
Connecting via Wired Connection
Okay review here, let’s start with connecting your SteelSeries headset using a wire. It’s like plugging in your headphones to your computer. First, check if your computer has the right holes for the wire. Then, grab the cable that comes with your headset. One end goes into your headset, and the other end goes into your computer. It’s like putting a puzzle piece in the right spot! After that, we might need to do a tiny bit of computer stuff to make sure it plays sound through your headset. But don’t worry, we’ll walk you through it.
Check Your PC’s Ports
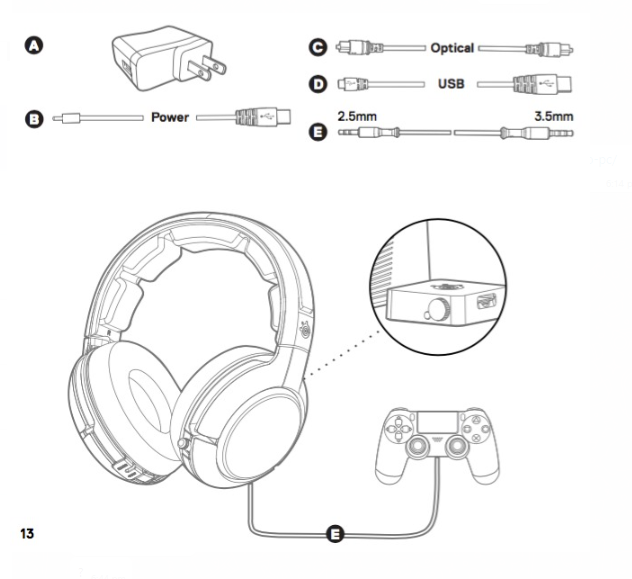
Before you begin, ensure your PC has the necessary ports for connecting your SteelSeries headset. Most SteelSeries headsets come with a 3.5mm audio jack or a USB connector. If your PC has both options, choose the one that suits your preferences.
Connect the Cable
Now, let’s connect the cable. It’s like putting two pieces together. Take one end of the cable and plug it into your headset. It goes into a special hole on your headset. It’s like putting the puzzle piece in the right spot. Then, take the other end and plug it into your computer. It’s like connecting two friends with a bridge. That’s it! You’re almost ready to hear cool sounds.
Configure Audio Settings
Let’s set up your computer to talk to your headset. It’s like making sure they can be good friends. You need to tell your computer that you want to use your SteelSeries headset for sound. We’ll show you how to do it step by step. Just follow along, and your headset will start playing sound from your computer in no time.
Connecting via Wireless Connection
Sure thing! Connecting your SteelSeries headset without any wires is super cool! It’s like magic! Review here first, make sure your headset has enough power, just like making sure your toys have batteries. Then, press the button on your headset to make it talk to your computer. You’ll see a little light flashing, and that means they’re friends now. Now, go to your computer’s settings, find the Bluetooth thing, and tell your computer to look for your headset. Click on your headset’s name, and ta-da! They’re connected! No more tangled wires, and you’re ready to have fun.
Conclusion
So, there you go, my friend! You’ve learned how to connect your amazing SteelSeries headset to your computer. It’s not as tricky as it might seem. You just need to follow the steps we talked about, and you’ll be all set. Now, when you want to play games, talk with your friends, or enjoy music on your computer, you know how to make your headset work. It’s like magic! Have tons of fun with your headset, and remember, you can always come back here if you need a quick reminder. Enjoy your awesome audio adventure!